Managing Virtual Machines with Google Compute Engine
2015-05-17
From small personal projects to the data-ecosystems of fortune 500 companies, IaaS (Infrastructure as a Service) is becoming the standard way of obtaining infrastructure for computing-related tasks. IaaS is, in short, a way of supplying computational-infrastructure that is similar to how you get water or electricity. Instead of you setting up your own pipes or electric-cables, you simply subscribe to a public system that runs on a common infrastructure and get charged a standard rate for a given unit of the utility you are consuming. In the same way, IaaS allows you to use 'public' data-centers (public meaning not owned by you) to host your applications while paying a standard rate for the computing power, memory, and bandwidth used. Amazon is the most popoular infrastructure supplier with AWS, but Google, Microsoft, Rackspace, and many others are also big players in the IaaS game. All of these companies offer APIs which allow us to create, destroy, and manage VMs programmatically. Today, I'll be going over how to do this through Google's IaaS offering, Compute Engine.
I'll start by going over how to set up an account with the Google Developers program and install the Google Cloud SDK, which will give you simple command-line access to Google Cloud Services. Then I'll show you how to use the gcloud tool to access the Compute Engine API from your command-line. Finally, I'll go over my library libGVM, which is a small container of python scripts that wraps around the API provided by Google. This library keeps track of running instances and instance-snapshots, lets you set default values for various virtual-machine parameters, and much more.
Setting up Google Cloud Services
To do anything with Google Cloud Services (App-Engine, Compute-Engine, BigQuery, etc.), you first need to make an account at this webpage. They offer a nice free trial to start, $300 worth of credits to use in the first 60 days, which is enough to spin up quite a few VMs. Still, you will have to enter in some sort of payment information to make an account. Once you have an account made, you'll need to make a project. You can do this from the developer home page, just click on "Create Project". Give this one a simple name you'll remember, like 'vm-test'. The name will be used later but doesn't need to be too meaningful since this is just a test and you can always make new projects from your developer home page. All actions done through GCS have to be done through a project that you've made, as you are billed monthly per project.
Now that you've signed up, it's time to install the Google-Cloud-SDK. This is a simple development kit that will give you command-line access to Google Cloud Services. I will be using Linux (as always) for this post, but Windows users should be able to go here to get the download client, which will walk you through the process. Beyond that, I'm not sure if the commands I give for using the SDK via the command-line will work for Windows users, so you guys might be shit-out-of-luck. OSX users should be fine using the commands given in this post.
Get and Configure the Compute-Engine SDK
curl https://sdk.cloud.google.com | bash # will start the config process
# restart your terminal now
gcloud auth login # opens your browser to authenticate with google
gcloud config set project $PROJECT_NAME # *optional*
About line 1, I know you shouldn't in general pipe commands from the internet directly to bash, but it's from google so I'd consider it a trusted source. The config process will ask if you would like to save the SDK binaries to your system path, agree to this. You will then need to close the current terminal and open it again. The last command is optional, but if you have only one project you're working on it sets the default so your commands still work if you don't include the --project $PROJECT_NAME option on a later gcloud command. The project name in this case would be the name of the project you made earlier, like 'vm-test'.
Virtual Machines on Google Compute Engine
The Google Cloud Service that lets you create VMs is called Google Compute Engine. The Compute Engine Dashboard can be accessed through the dashboard of any GCS project you have made, just look under the Compute Engine section of the sidebar on the left. This dashboard gives you a graphical way of checking account charges, creating VMs, deleting VMs, and monitoring overall usage. Making a virtual machine through Compute Engine is called spinning up an instance. VM instances have different properties, such as their number of virtual CPU cores, amount of main memory, and geographic location. The values you select for these properties will affect the performance and cost of running your virtual machine. These properties are listed and described below.- f1-micro
- g1-small
- n1-highcpu-16
- n1-highcpu-2
- n1-highcpu-32
- n1-highcpu-4
- n1-highcpu-8
- n1-highmem-16
- n1-highmem-2
- n1-highmem-32
- n1-highmem-4
- n1-highmem-8
- n1-standard-1
- n1-standard-16
- n1-standard-2
- n1-standard-32
- n1-standard-4
- n1-standard-8
- us-central1-b
- us-central1-f
- us-central1-a
- us-central1-c
- asia-east1-c
- asia-east1-a
- asia-east1-b
- europe-west1-c
- europe-west1-b
- europe-west1-d
- ubuntu-12-04
- ubuntu-14-04
- ubuntu-14-10
- ubuntu-15-04
- coreos
- debian-7-backports
- debian-7
- container-vm
- opensuse-13
- rhel-6
- rhel-7
- sles-11
- sles-12
- windows-2008-r2
- windows-2012-r2
Machine-Types
These are the different values you can select for the type of machine that you want your VM to run on. The f1-micro and g1-small come with very small amounts of main memory (0.6GB and 1.7GB respectively), and very little cpu-power (the f1-micro shares a core with other CPUs). These are also the cheapest to run at ¢1.0 and ¢2.5 per hour at average use, and thus they are good to start off with as they are almost free to operate for just a few hours at a time. After these come the n1-standard-x group, which represent a good compromise between price, main memory, and CPU cores. The x at the end represents the number of CPU cores that specific machine-type comes with. You can also opt for the n1-highmem-x which, not surprisingly, comes with more memory per core than the n1-standard-x. Finally, there is also the n1-highcpu-x which comes with more CPU cores per unit of memory than the others. The complete description of machine types can be found on this page and information on the pricing can be found here. For most testing purposes, I've found it's best to start with the g1-small. It is powerful enough to run your code in a timely manner but is still cheap enough to leave running for days at a time while spending only a few dollars.
Zones
Google has many data-centers across the world, and your VM will be running on one of them. The prices of data egress/ingress and specific machine-types vary slightly with location, more can be found at this page. You're probably best off choosing a zone closest to you or closest to where the main user-base for your application will be. I tend to go with us-central1-b and haven't had any issues.
Boot-Images
This is just a list of the default OS images that are available to you when you want to create a new vM instance. Note that some of these (like Windows, RHEL, and SUSE) are denoted as premium operating systems and will cost you more to run than the free ones, like Ubuntu and Debian. These images are only used if you want to start a new VM from scratch, you can also start a new VM from a snapshot of an old or existing VM. A snapshot is just an image of the state of a VM at the point in time it was taken, I'll go over their use in a bit.
Using gcloud to Make, Manage, and Deleted Instances
Note - The following commands will cause you to incur a few cents worth of charges, if you just signed up you should have $300 credit to use in which case your card/account won't be billed until you go over that limit.Creating an Instance
Now that you've gotten the SDK and know the different types of VMs that can be spun-up on their servers, it's time to make some VMs of our own. We'll do this via the command-line with the gcloud tool manually.
Enter the following commands from any directory you wish, but you might want to go ahead and make a directory that you will perform all of the future commands from. We'll start by making a g1-small instance using your boot-image of choice in your zone of choice, I'll be using Ubuntu 15.04 in us-central1-b. You also need to choose the name you are giving to this specific VM instance. Each project can have many VM instances working under it. If you forget the name after submitting this command it's okay, we can look it up again later.
gcloud compute --project "$PROJECT_NAME" instances create "$INSTANCE_NAME" --zone "us-central1-b" --machine-type "g1-small" --network "default" --maintenance-policy "MIGRATE" --scopes "https://www.googleapis.com/auth/devstorage.read_write,https://www.googleapis.com/auth/logging.write" --tags "http-server,https-server" --image "ubuntu-15-04" --boot-disk-type "pd-standard" --boot-disk-device-name "$INSTANCE_NAME"
Yes, that is a long command. Notice you can't just copy and execute this command in your terminal (you shouldn't do that anyways), you need to fill in the INSTANCE_NAME and PROJECT_NAME values appropriately before it'll work. After running it you should get the following output if successfull :
NAME           ZONE          MACHINE_TYPE PREEMPTIBLE INTERNAL_IP   EXTERNAL_IP    STATUS
$INSTANCE_NAME us-central1-b g1-small                 10.xx.xx.xx 104.xx.xx.xx RUNNING
Congrats on spinning up your first virtual machine through Compute Engine. If you go to the "VM Instances" tab under the Compute Engine section of your project dashboard, you'll see that you have a single instance running. You can also always check what instances you have running with the following command :
gcloud compute instances list
This will give you an output identical to the one above, list all of your VMs and their properties in a table.
Logging into Your Instance
The next logical step is to ssh into your virtual machine, and we can use the gcloud tool to do this. Enter the following, substituting in the appropriate values for your project and instance names.
gcloud compute ssh "$INSTANCE" --zone "us-central1-b" --project "$PROJECT_NAME"
Note that you need to supply the same zone that you used to create the instance, if you supply the wrong one you will get an error. If you don't supply one you will be prompted to select one before logging in. Now that you're logged in you should see an empty home directory with the username you used to login with. You can go ahead and install git, build-essential, and other tools to let you screw around on your VM using the command-line.
Taking a Snapshot
Snapshots are images of the exact state of your VM at the time the snapshot is taken. These snapshots are then saved on your GCS account and can be used to instantiate new instances in the future. Note that you will need to choose a name for each snapshot, and while running the command you will be prompted for a short description of the snapshot. Use the following commands to make a snapshot of a running instance :
SNAPSHOT_PATH="https://www.googleapis.com/compute/v1/projects/"
SNAPSHOT_PATH+="$PROJECT_NAME"
SNAPSHOT_PATH+="/zones/$ZONE/disks/"
SNAPSHOT_PATH+="$INSTANCE_NAME"

gcloud compute --project "$PROJECT_NAME" disks snapshot  "$SNAPSHOT_PATH" --zone "$ZONE" --snapshot-names "$SNAPSHOT_NAME"
This snapshot will now be viewable on your GCS console under the project it was created under. It can also be used to instantiate new instances, which I'll go over next.
Making a New Instance from a Snapshot
This is a rather convenient tool supplied by GCS, once you get a test VM to exactly the way you want it to be, simply take a snapshot and you're able to spin-up clones of it whenever you want. These clones can be a different machine-type, allowing you to test on a small machine and launch on a large one with identical memory-contents. The code to spin-up an instance from a snapshot is given below :
gcloud compute --project "$PROJECT_NAME" disks create "$INSTANCE_NAME" --zone "$ZONE" --source-snapshot "$SNAPSHOT_NAME" --type "pd-standard"
gcloud compute --project "$PROJECT_NAME" instances create "$INSTANCE_NAME" --zone "$ZONE" --machine-type "$MACHINE_TYPE" --network "default" --maintenance-policy "MIGRATE" --scopes "https://www.googleapis.com/auth/devstorage.read_write" "https://www.googleapis.com/auth/logging.write" --tags "http-server" "https-server" --disk "name=$INSTANCE_NAME" "device-name=$INSTANCE_NAME" "mode=rw" "boot=yes" "auto-delete=yes"
This makes a disk out of the snapshot given by SNAPSHOT_NAME, then creates an instance out of this disk. You can then use the gcloud compute instances list command to make sure the new instance is running and login using the same command given before.
Deleting an Instance
Deleting an instance is pretty straight-forward. Simply call the command below, giving your instance name, project name, and zone as arguments.
gcloud compute instances delete "$INSTANCE_NAME" --zone "$ZONE" --project "$PROJECT_NAME"
After it is done you will get a short confirmation message :Deleted [https://www.googleapis.com/compute/v1/projects/$PROJECT/zones/$ZONE/instances/$INSTANCE].Deleting a Snapshot
Deleting a snapshot is also pretty straight-forward. Call the gcloud command below with the snapshot name and project name as arguments.
gcloud compute snapshots delete "$SNAPSHOT_NAME --project "$PROJECT_NAME"
There is a lot more you can do with gcloud, from setting firewall-rules to performing entire system health-checks, but I think i've given you more than enough to get started. The complete Compute Engine SDK documentation can be found here if you are wishing to learn more.
LibGVM
Seeing the verbosity of some of these commands, it might seem like a good idea to write some scripts to simplify this process. I've done just that with the simple libGVM python library.
Get and Configure LibGVM
You can clone this project directly from github, then run the configuration script that will let you set-up the library for your projects and account.
git clone https://github.com/jhallard/libgvm.git
cd libgvm.git
cmod +x config.sh && ./config.sh
The configuration will allow you to set some default values for the library, note that these defaults are only used if a script is called with the `-d` option. The defaults are as follows :
- zone - Set the default region (us-central1, asia-east1, etc) for all future vm creations.
- machine type - Set the default machine type (n1-standard, g1-small, etc.).
- boot image - Set the default OS boot image (ubuntu 15.04, Debian-7, etc.).
- projects - Set the list of project names that belong to you through Google Developers Console. If only one is set that one will be auto selected with the `-d` option.
Options
-
-h- Prints a usage statement of description of the program. -
-d- Uses any default values it can load from the default files stored in/data/
Use LibGVM to Manage VMs
This library has a directory where it stores all of the possible machine types, zones, and boot-images, as well as your current instances and existing snapshots. It also stores your default values, so if you use any of the following scripts with the -d option the default zone, machine type, and boot image are loaded. If no defaults are stored or you don't use that option, you will be presented with numbered lists of options to choose from for each of the VM parameters, which means you don't need to remember any of the gcloud-specific syntax from before. The various scripts are given below.
This will make an instance and store it in the /data/current_instances file for future reference when logging into or deleting an instance.
./make_new_instance.py -d "$INSTANCE_NAME"
A picture of this process is given below :

This will make an instance from a snapshot and store it in the /data/current_instances file for future reference when logging into or deleting an instance.
./make_new_instance_snapshot.py -d "$INSTANCE_NAME" "$SNAPSHOT_NAME"s
Logging into an Instance
This will let you log into on of your existing instances.
./login.py -d "$INSTANCE_NAME"
Making a Snapshot
The following command will let you make a snapshot of a current instance and will store the snapshot name and zone in /data/current_snapshots.
./make_snapshot.py -d "$INSTANCE_NAME" "$SNAPSHOT_NAME"
Deleting an Instance
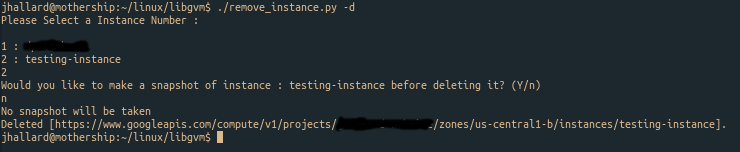
This will delete one of your existing instances, you will be asked if you want to make a snapshot of the instance before deletion is completed.
./remove_instance.py -d "$INSTANCE_NAME"
A picture of this process is given below :
This will delete one of your existing snapshots.
./remove_snapshot.py -d "$SNAPSHOT_NAME"
LibGVM isn't perfect yet, but it works pretty well and vastly simplifies the management of VMs over looking up commands from the SDK documentation. I'm planning on adding more commands, including the ability to move instances and disks between different zones, as well as adding some built-in log-capturing functionality for the running VMs. The project is open-source so feel free to contribute if you wish.
tags : python, google, vm